[Lipicios] Global Meteor Network (GMN)
Salutari. A promis ca transfer aici informatiile importante ce s-au discutat pe grupul de WhatsApp si pe e-mail cu GMN, sa nu pierdem informatia si sa fie totul centralizat.
Resurse GMN:
- Grupul de e-mail GMN: https://globalmeteornetwork.groups.io
- Pagina Wiki: https://globalmeteornetwork.org//wiki/index.php?title=Main_Page
- Lista Cumparaturi/Tools: https://globalmeteornetwork.org/wiki/index.php?title=Shopping_list_and_tools_needed
- Ghid complet constructie: https://globalmeteornetwork.org/wiki/index.php?title=Build_%26_Install_%26_Setup_your_camera_-_The_complete_how-to
- Verificare status camere active: https://globalmeteornetwork.org/status/
Cateva detalii de la GMN cu privire la achizitia de componente:
- I buy most of the camera-related items from AliExpress. Please note that suppliers change quite often, so availability may vary.
- Sometimes the IMX-291 sensor is not available; in that case, I purchase the IMX-307 instead. When using the IMX-307, some additional tweaking and adjustments are required for proper operation.
- Items like the Raspberry Pi, its power supply, and other related electronics I purchase locally.
- The pi housing I still order from AliExpress.
Cateva detalii de la GMN cu privire la setup:
A few recommendations based on experience:
- Raspberry Pi placement
- It is not recommended to place the Pi inside the camera housing. Keeping it outside ensures better cooling and easier access for troubleshooting.
- Wired Internet connection
- If you connect a USB-Ethernet adapter to the Pi, you should not rely on WiFi. A wired connection is generally more stable during RMS operations.
Here’s a summary of how to connect an RMS Pi to the Internet:
Standard setup:
- Camera connects directly to the Pi via Ethernet.
- Pi connects to the Internet via WiFi or a second wired Ethernet port.
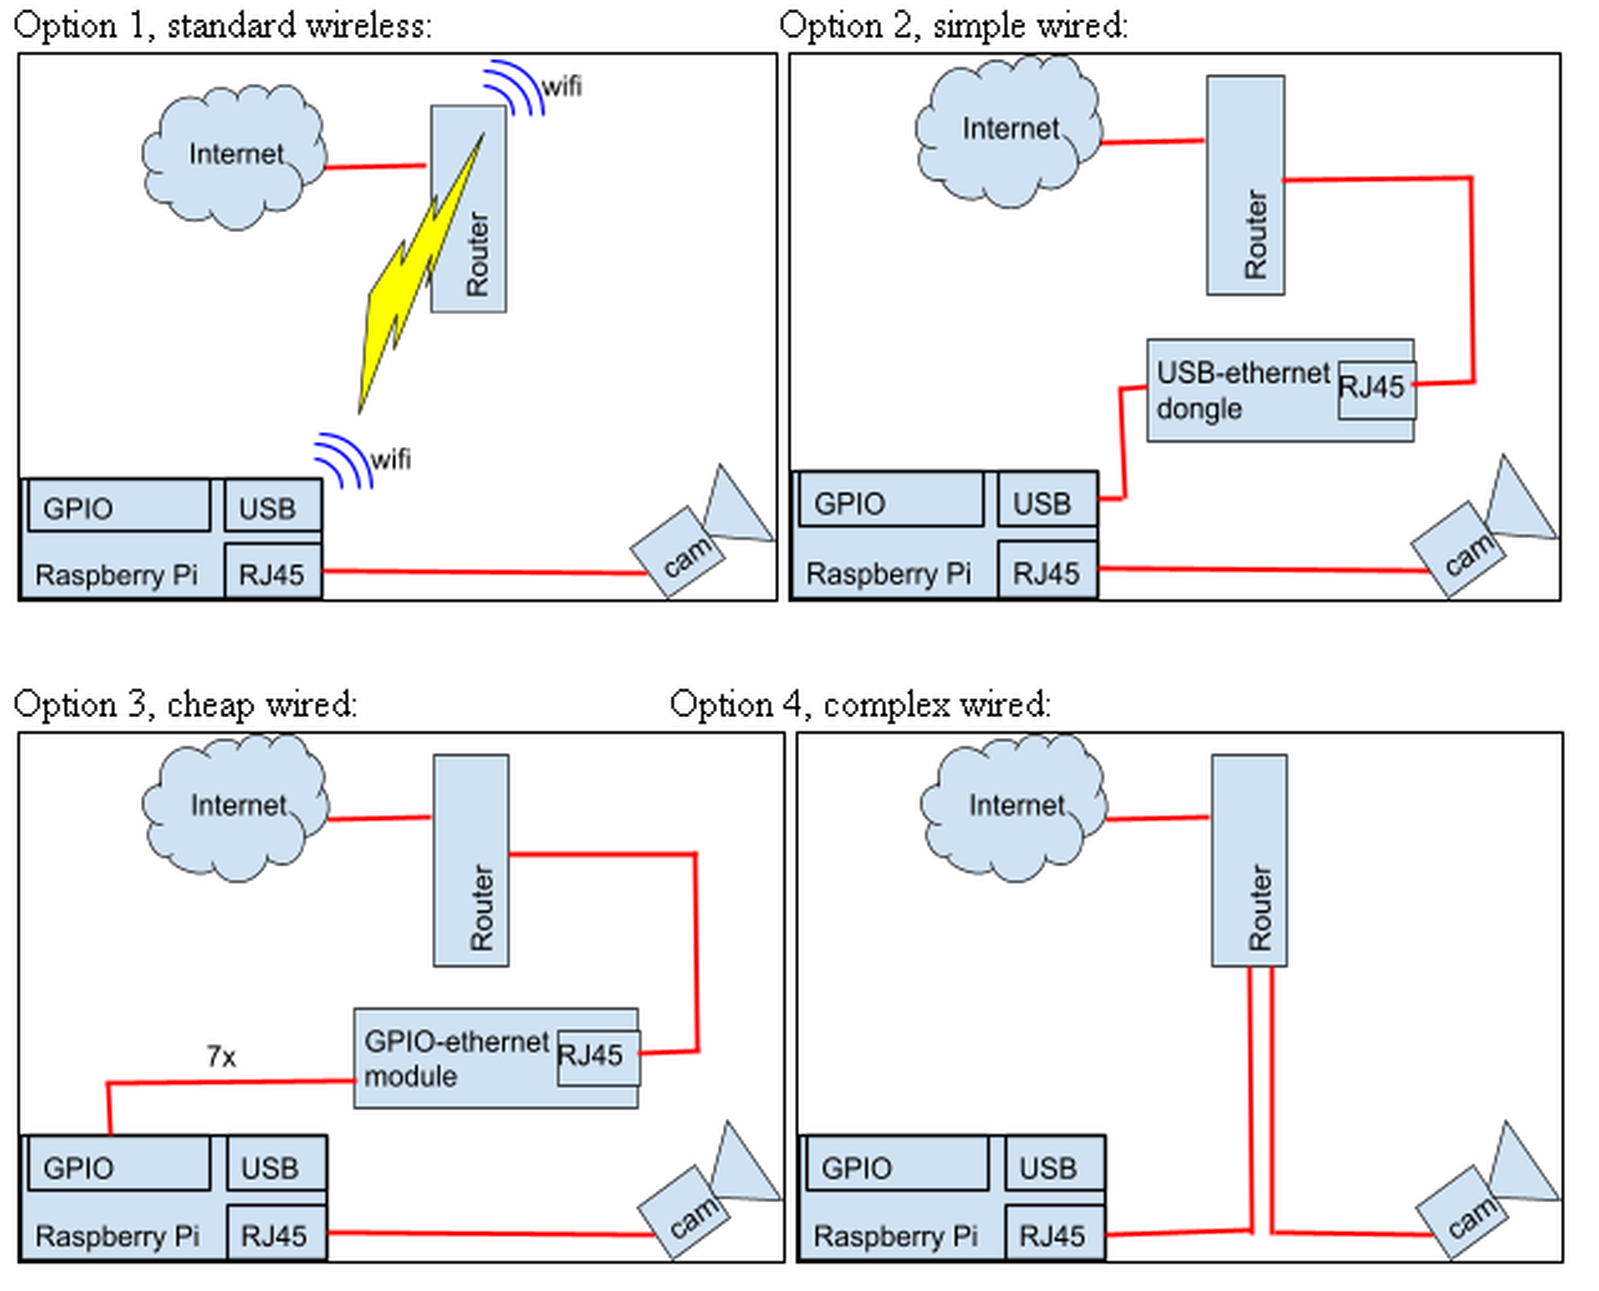
4 possible configurations:
- Camera → Pi → WiFi → Internet (standard, wireless)
- Camera → Pi → USB-Ethernet adapter → Internet (simple, wired)
- Camera → Pi → GPIO-Ethernet module → Internet (cheap, wired)
- Camera → Router, Pi → Router (complex, wired)
If WiFi gives intermittent or unreliable connections, a wired setup is preferred. Options 2, 3, or 4 provide a second wired connection. The camera should always connect directly to the Pi via Ethernet.
Recommended option: Option 2 (Simple wired setup)
Instructions for Option 2:
- Purchase a USB-to-Ethernet adapter (e.g., TP-Link UE200, ~€12).
- Plug the adapter into a USB port on the RMS Pi.
- Connect the Ethernet cable from your router to the adapter.
- The LED on the adapter should blink, and on the desktop, the network icon will show eth1: configured, indicating an active wired connection.
- Once connected, you can turn off WiFi and Bluetooth to save power.
Option 4 is possible but requires significant changes to the Pi configuration and is more complex. It may be useful if you need to monitor the camera feed from a PC or web interface during data capture.
Cateva detalii cu privire la etansare:
The best is to put the PoE cable/48-12V converter inside the camera housing, not nearby exposed (it's not waterproof enough).
Use the best silicone sealant available - UV resistant and if possible "not-shrinking" (other wise after some time it shrinks and opens a submillimeter sized "cracks". This is especially important for the front panel and screws:
- put silicone sealant in the holes of the front screws, then put the screws through the silicon, then put silicone on top of them. Very good job does a circle crop of quality aluminum tape on top of the screw holes;
- put silicone under the rubber sealings for the cover (they are not well glued);
- silicone around the glass as in the wiki how-to guide
Ultima postare: Refractor Altair Astro Starwave Ascent triplet 102mm Cel mai nou membru al nostru: Mocioi Răzvan Gabriel Cristian Postări recente Postări necitite Etichete
Pictograme forum: Forumul nu conține postări necitite Forumul conține postări necitite
Pictograme de subiect: Nu s-a răspuns A răspuns Activ Fierbinte Lipicios Neaprobat Rezolvat Privat Închis

